How to Draw a Floor Plan with SmartDraw
Step 2. Input Room Dimensions
SmartDraw will open a work area for you with a rectangular room having default dimensions of 15'0" by 20'0". You can change these dimensions in one of two ways. Either click on a wall and slide it to its desired length, or click on the dimension and type in the measurement you want to use. When you do this, you'll note that the opposite wall will resize to the same dimension automatically.
We want to re-size this room to 13'8" by 20'6".
To resize just one wall, click at the corner and drag to resize the wall. Clicking in the middle of the wall will keep both opposing walls the same size.
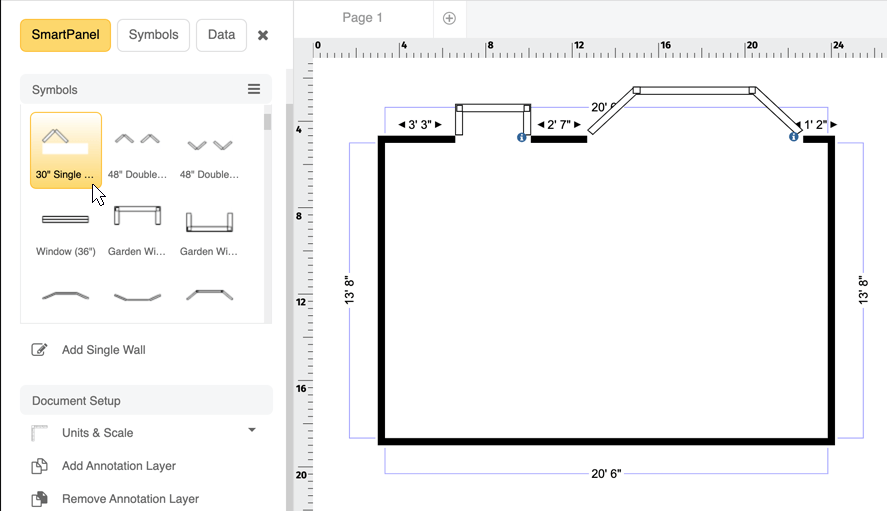
Step 3. Add Doors, Windows, and Wall Openings
You don't need to create openings in walls for your windows and doors; SmartDraw will do it for you automatically. Our kitchen plan has two wall openings into adjacent rooms, plus a garden window over the sink and a bay window viewing into the back yard.
Click Add Wall Opening in the SmartPanel. As you move your cursor onto the page, you'll see the wall opening shape. Position it anywhere on the appropriate wall and you'll see the icon change from a stamp to an anchor, indicating you can click to attach it to the wall. You can now resize the opening and move it around on the wall until it's positioned where you want.
Add windows in the same way. From the SmartPanel, you'll see a variety of door and window options. We'll add a garden window and a bay window, as shown below. Because the default size of the bay window is 12' across and ours measures only 6' we had to adjust the size by clicking on the measurement and typing in the new figure.
Note that as you stamp elements into your work area, you can rotate them by clicking and holding on the rotate button and then moving your mouse around in a clockwise or counterclockwise direction. When you get it into the proper orientation, release the button.
Step 4. Lay Out Countertops
Click on the drop-down list in the SmartPanel and then select Kitchens. You'll see a number of appliances, cabinets and countertops. If you're going to use stock cabinets, then you should use those here instead of countertops since their sizes can't be changed. Our design will use custom cabinets, so we're going to lay out our countertop first.
We'll start by placing a corner counter in the upper left hand corner of the room. Just stamp it anywhere in the room, then use the rotate button to turn it 180 degrees. Now drag it into position in the upper left-hand corner of the room, as shown.
Next, we'll add base cabinets to our plan. As mentioned previously, we're designing for custom cabinets, so we're not limited to standard sizes. The default base cabinet is 12" wide by 24" deep. By sliding our dishwasher left a few inches, we can fit a 24" base cabinet to the right. We can resize this cabinet to be 2'0" in width and 2'4" in height (depth), then slide it into position.
Step 8. Add Upper Cabinets
We'll add upper cabinets in a similar manner. Select Wall Cabinet from the SmartPanel. The default size is 1'0" by 2'0", which we want to change to 1'4" by 1'8". After rotating it 90 degrees and dragging it into position, we'll want to make three more exactly like it. To do this, right click on the item, select Copy and then Paste. Each time you do this, drag the newly created upper cabinet into position, as shown below.


